Part 1. Network setup
I've spent the last few months building a better home lab. These are the requirements,
- easy to setup simple networks, routing etc
- easy to create virtual machines with arbitrary OS with minimal manual work
- reroute whole networks through a VPN (need this for OSINT)
- reachable via VPN from outside
- access the various LANs via wifi
- have separate LANs for VMs or physical devices that pose a security risk, eg to develop or research vulnerable setups, or to research IoT devices
- reasonably secure
- cheap to build
From the network point of view, the following diagram demonstrates the general idea.
           +----------+
           | internet |
           +----------+
                 ^
                 |
             +--------------+         +---------+
             |router  + vpn |-------->|elsewhere|
           --+------------^-+         +---------+
         -/     ^          \
      --/       |           \
    -/          |            \
+------+     +------+     +-----+
| prod |     | vuln |     | vpn |
| lan  |---> | lan  |     | lan |
+------+     +------+     +-----+
Note that prod lan can access vuln lan, but not v.v. Also, the vuln lan can access the internet. VPN LAN should be separate and only allow clients to access the internet through a VPN.
Hardware
We need at least three different LANs (prod, vuln, vpn). Possibly more. It's not feasible to have separate physical switches, physical network interfaces and cabling for all the LANs. VLANs is a better idea. My local store had a Zyxel GS1900-24E in the discount bin so I'm using that now. It has 24 1Gb ports and has a reasonable web UI and supports configuring VLANs as tagged/untagged for each port separately.
As router I'm using a cheap Lenovo desktop also bought from the discount bin a few years ago with a second NIC installed. Any PC could do, really.
Wifi APs are MikroTik hAP Lite TC, I bought a couple last year, also they were cheap. I'm using them as wifi bridges only.
Setup
pfSense
pfSense is fairly simple to install. Download the ISO image, copy it on a USB stick, then boot the router PC off it, and install with default options. Configure the DHCP address range on your LAN so that there's some space left for static IPs. For example, if your LAN network is 192.168.19.0/24, the DHCP client range could be 192.168.19.50 - 192.168.19.150. Don't use 192.168.0.0/24 or 192.168.1.0/24, for reasons. This creates a simple LAN that can access the internet. For computers on the production LAN, we use this LAN as untagged on the physical LAN interface on the VMS and also as untagged on most physical ports on the switch. The different LANs we configure as VLANs.
I configured the “domain name” (Setup -> General) as local.lan. It looks like valid domain name (domain.tld) and doesn't resolve to an actual domain, de facto.
For the vuln lan, we create a new VLAN type interface and call it HAXVMS, like this:
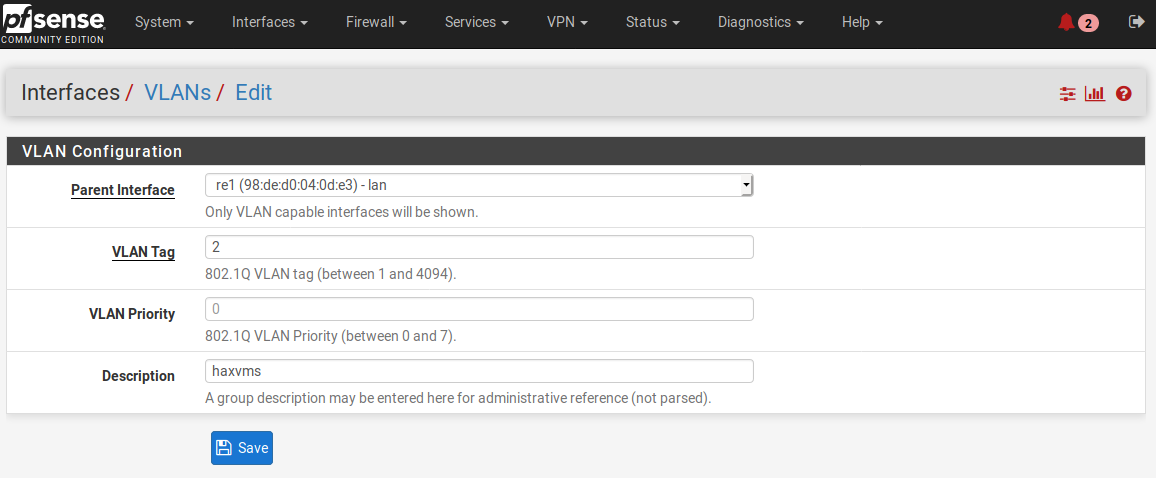
Remember to select lan as the physical interface.
Then, navigate to Interfaces -> Interface Assignments and assign the new VLAN a new interface. Here, we call it HAXVMS. When you have defined VLANs that don't yet have an attached network interface, they show up in the “Available network ports” popup, like this:

Now, click the “Add” button. The new port appears on the list on the Interface Assignments screen and is called OPT(number). Open it, give it a more descriptive name and enable it. Also assign it a new static, private IP address. Remember to save your changes. Then, navigate to Services -> DHCP Server, select your new network interface, and enable DHCP Server on the new interface.
To allow the new haxvms lan to access the internet, create three rules for the new LAN. First rule is to deny the new LAN to the production LAN and the VPN LAN(s). Then, create rules that allow everything from the interface. The rules are applied top down. When specifying firewall rules, one should place more specific rules first and general rules last. In this case, we allow all traffic from the HAXVMS LAN if it's not going to the production lan. Navigate to Firewall -> Rules, then select the new LAN, and create the three rules. The result should look like this:
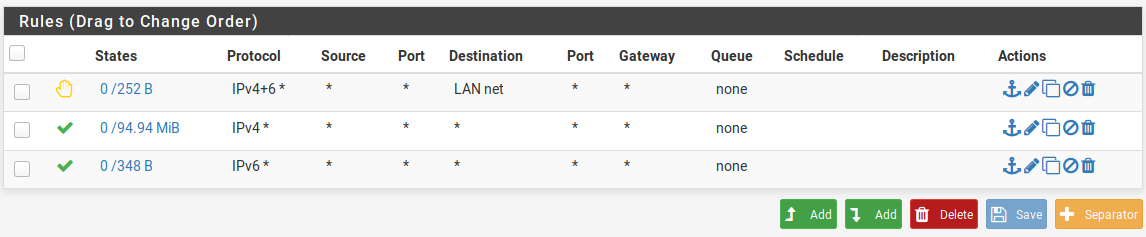
Also, apply the changes after doing this.
One more thing I find useful is the DNS Resolver (available under the Services menu). It can be configured to register DHCP clients and DHCP static mappings. This means you can eg. ssh to your VMs by using their names. (eg. when a Linux requests an IP through DHCP, it tells it's what its hostname says.)
Switch & cabling
I won't cover the switch setup much in detail. Shortly, if you plan on using VLANs, note that a VLAN can be tagged or untagged on a port. The VLAN setup described above will place the haxvms VLAN traffic as tagged on its LAN port. Configure that VLAN as tagged on the corresponding physical port on the switch. To then use that VLAN, there are two use cases:
- Configure a switch port to offer that VLAN as untagged on a port. This applies when you directly want to connect a device to that VLAN. For example, a network camera you don't trust can be connected this way so it ends up in the
haxvmslan. - If you run a virtualization platform (eg. a PC running the proxmox virtualization environment), connect the virtual machine host to a switch port that has the tagged VLANs enabled in its port on the switch. Then configure the guest VM interfaces with the corresponding VLAN tag.
MikroTik
I won't cover the MikroTik setup much in detail here. It has a web GUI. Configure it to not do NAT, DHCP, and not request an upstream address through DHCP. Assign it a static address in your production LAN and plug it in your switch.
To allow wlan clients to access the VLANs, MikroTik can be configured to route tagged VLANs to “virtual” access points. This is where the MikroTik documentation doesn't shine and it took a while to find out how to do this. Follow these steps:
- open web GUI
- click “WebFig”
- Add New -> Virtual
- name the new interface “wlan2”, having “wlan1” as “Master Interface”. Also set SSID.
- VLAN mode “tagged”, and put your desired VLAN tag here
- Click OK. You should now see a new Wifi AP with any wireless clients. You can't setup the VLAN routing from the web gui. Instead, telnet to the box with your admin credentials and execute the following commands:
[admin@MikroTik] > /interface vlan
[admin@MikroTik] /interface vlan> add name=vlan2 vlan-id=2 interface=bridge
[admin@MikroTik] /interface vlan> /interface bridge port
[admin@MikroTik] /interface bridge port> add bridge=bridge interface=wlan2 pvid=2
[admin@MikroTik] /interface bridge port>
In the example above, we “bridge” the VLAN with id 2 to the new wlan2 interface. If your switch is configured correctly to make the vlan available in tagged mode for both pfsense and the mikrotik AP, wlan clients connected to the new virtual AP should end up in the correct LAN.
Note that the AP doesn't need an interface on the other VLANs.
Summary
This setup has
- a production LAN for using computers in a way that people usually use computers (browsing the internet, gaming, working, etc)
- network devices can be configured in the production LAN (a more secure way would be to separate the management LAN and the production LAN. Given reasonable endpoint security, this is kind of OK)
- a separate subnet for devices that can't be trusted to access the production LAN
I'll cover the VPN lan in a separate post. (The LAN that routes all clients to the internet through VPN)